Home | Business Apps |
MENU

Overview
Dubber is a cloud-based call recording and data insights service that enables users to record, save, replay, and interact with their calls. Dubber can be accessed through a web browser. Cloud Call Recording and Playback services are available for businesses and individuals.
This guide is specific to users within an organization and outlines how to use the Dubber Call Recording portal.
1.
Logging in
To sign in to Dubber:
- Open your browser and go to the following link: https://us.dubber.net/
 Click image for large view
- Enter your email address and password
- Click Login.
Note: If you forgot your password, click the Forgot password button, enter your email address, and click Submit. Your password can be reset by following the instructions sent to your email.
Passwords must meet the following requirements:
- Be a minimum of 8 characters
- Include one lowercase and one uppercase letter
- Include a digit
- Include a special character
- Not be easily guessable or related to your name or email address.
2.
Navigation
Upon sign-in, end users land on the Recordings page, where they can handle call recordings.
Users can use the filter options at the top of the page to narrow and specify their search.
Search and filter options include:

- The Search bar - Use the chevron arrow to specify where to search in and what to filter by. Enter a query and date if applicable, and click Search or select Cancel to exit.
- Recorded-by - Select the dropdown arrow to only filter by All or your recordings (My Recordings).
- Icons - Hover over the icons to reveal the filter-by options:
- Recordings
- Voicemails
- Meetings
- Tagged items
- Starred items
- Restrict to dub.point
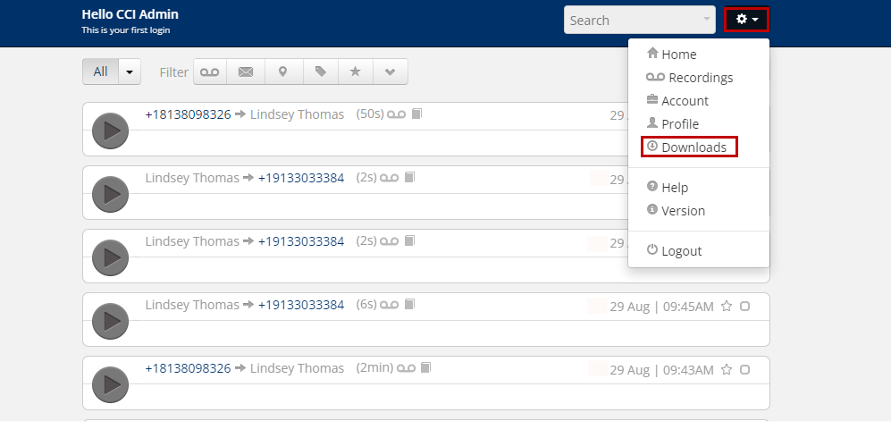
- Use the Settings icon to access the following:
- Home - The primary Dubber page.
- Recordings - View and interact with recordings.
- Account - Your general account profile and options.
- Profile - View and edit your name, username, language, and other information.
- Help - Read Dubber documentation
- Version - Provides Dubber version information, user agent browser info, and time of the last load.
- Logout - Signs you out of the Dubber portal.
3.
Dubber Media Player
The Dubber Media Player enables you to handle your organization’s recordings.

The player consists of:
- Calling parties - The player shows whether you placed the outgoing call or if you answered the inbound call. The phone number of the other party is displayed.
- Duration - Length of the recording.
- Media Type - An icon indicates what type of recorded media this is, such as a call recording, voicemail, meeting, or other.
- Transcription (Requires Dubber Insights)- If a transcription is available, the icon appears in gray; otherwise, a failed transcription is red.
- AI Sentiment (Requires Dubber Insights)- Dubber provides an AI sentiment analysis of the interaction. Users can rate the accuracy of the sentiment to help improve the quality of this Dubber service.
- Date and Time - Displays the time when the interaction occurred.
- Star - Enables users to favorite the interaction, making it more visible and accessible.
- Selection - Select the box to choose an action from the Recordings dropdown.
Hover over a recording to display additional options. Select one of the following:

- Recording information - Displays information from the call, such as the external call ID and tracking IDs.
- Share - Send the recording to recipients.
- Tags - View or add tags.
- Download - Download the recording. Note: This is an admin-only function.
To play a recording:
- Click the Play button to listen to the recording.
- The slider displays the progression of the recording and can be dragged to the desired timestamp.
- Use the rewind or fast-forward buttons to go back 15 seconds or advance by 15 seconds.
- Set the playback speed as needed.
4.
Recording Tags
Users can create recording tags to make searching through them quicker and easier. You can only tag the recordings available on your account.

To tag recordings:
- Select the recording you want to tag.
- Click the Tag icon
- Enter a tag, for example, Sales. Follow the tag with a comma to create it.
- Click Save.
Your tag is saved and visible at the bottom of the recording. When searching through your account using the tagged word(s), you will bring up recordings with the tag.
To tag multiple recordings simultaneously:
- Select the recordings by checking the square box.
- Select the Recordings button (at the top of the page).
- Click Add Tags.
- Enter tags and click Save.
To remove a tag:
- Open the Tag window
- Click the “x” next to the tag.
- Click Save.
5.
Search for Recordings
There are a number of ways to search for recordings in the Dubber portal.
Search Bar
Use the search bar to look for specific criteria, such as caller ID, date, or time.
Enter keywords or other normal searches as needed. You can also search by call length and sentiments.

To search through a recording by its duration:
- Type using the formats: "shorter_than:hh:mm:ss" or "longer_than:hh:mm:ss".
- Example: To search for recordings shorter than 5 minutes, type in the search bar: "shorter_than:00:05:00" and press Enter.
This brings up all recordings in your account that are shorter than 5 minutes.
To search by the recording’s sentiment(Requires Dubber Insights):
- Type "sentiment:negative" or "sentiment:positive"
- Press Enter.
- Recordings that have a positive or negative sentiment appear.
Note: Dubber AI must be enabled to use this functionality.
Smart Search
A Smart Search can be performed using the search bar and is typically used when there are many pages of recordings in the Dubber portal. Smart Search helps you look for a recording within a date range or on a specific date. You can also look for a recording with specific verbiage or a recording that has been tagged.

To perform a Smart Search:
- Expand the chevron button in the search bar.
- Search through recordings using extra criteria in addition to the filter functions at the top of the page.
- Use the query field to search for a specific word within your recording library.
- Example: If you want to check all the recordings that have "test," enter that word and click Search.
- Use the date field to include a date range within this search and a specific time within that date.
- When you click in that space, a menu appears.
- Click the Custom button and un-tick the Show all day checkbox to look for a recording within a specific time.
Filter Icons
Use the filter icons to search for recordings by category and type.

- Recordings: You can filter the page by whether it is a call recording or a voicemail.
- Voicemails: Filter the page by voicemail only.
- Meetings: Filter by meetings.
- Tagged items: Filter the page by recordings that have been tagged.
- Starred: Filter the page by recordings you have favored.
- Restrict to dub.point: Filter by recordings created by a specific user.
6.
Share Recordings
Users can share recordings as emailed links. Up to 10 emails can be entered at the time of sharing.

To share a recording:
- Hover over a recording and click Share.
- Enter up to 10 email addresses separated by a comma or colon, or press Enter.
- Enter a subject and message.
- Check the box to confirm you understand the sharing terms and conditions.
- Click Share.
Note: The call recording link is only valid for 24 hours.
7.
Additional User Features
Some users may have access to additional features depending on what has been enabled by their administrator.
Download Recordings

To download a recording:
- Select a recording and hover over it.
- Click the Download button.
- Confirm you’d like to download the recording.
Note: The link is only valid for 60 seconds. If it has expired, close the dialog box and try again. - Click Download.
To download multiple recordings:
-
- Select the recordings you want to download by checking the box at the top right corner of the recording.

-
- Go to the “Recordings” drop-down and select “Download”.

-
- The system will create a .zip file that can be downloaded once it’s ready for download
- To access your file, click on the gear at the top of the screen, then “Downloads”
-
- To download your Zip file, click the download button once the file is ready.

-
- Click “Download.” Note: The “Download” button will stop working after 60 seconds.

8.
Profile Features
You can access the User profile to view your information or make changes.
- Click the Settings icon
- Select Profile.
- Update the fields and click Save.

- Role - The seat or license type assigned by your organization’s administrator.
- Username - Your email address. Click Change to update this.
- Name - Your display name.
- Mobile - Specify a mobile phone number.
- Language - Select a language from the list.
- API Applications - A list of API applications is displayed if any are associated with your account.
9.
Recording Calls
Users can record incoming or outbound calls using their desk phones and access the recordings in the Dubber Portal.
Note: This feature may require setup by your administrator.
Different recording modes are available, and steps may vary depending on the phone type used.
- Always Mode - The entire incoming or outgoing call is recorded, and no control options are available to users. During active calls, the phone displays a Record symbol. Call recording stops when the call ends, and the call is stored on the server.
- Always with Pause/Resume Support Mode - Call recording automatically begins when the call connects, and the Pause and Resume soft keys are available. The phone display indicates the status of the call recording state. Call recording stops when the call ends, and the recorded part of the call is stored on the server.
- On-Demand Mode - Call recording starts on the server when the call connects, but the recorded file is not saved until the user initiates the recording. When the user presses the Start soft key, the recording is saved to the server, and the phone displays the Pause and Resume soft keys.
- On-Demand Mode with User-Initiated Start Mode - Call recording does not begin automatically, and a Record soft key displays. To record an active call, press Record > Start to begin recording and save the recording to the server. While recording, the phone displays the Pause, Resume, and Stop soft keys.
To record a call on the Poly Edge E320 phone:
- Press the More button and select Record.
- Press Start.
A message appears that the recording has begun. - Press Pause to pause the recording. Press Resume to resume recording.
- Press Exit to return to the menu.
To end the recording, end the call by pressing End Call or hanging up. The recording is saved and will appear in the Dubber Portal.